If you’ve ever wanted to start meal planning but are overwhelmed at the prospect, then I have an easy, inexpensive solution for you. It’s an app called Plan to Eat, and I’ve been using it since 2015 to feed myself and my family. In this Plan to Eat review post, I’ll be showing you not only how the app works, but also all of the ways it can save you time meal planning. If you would like to learn more about meal planning itself, then check out my ultimate guide to meal planning success.

Plan to Eat review part 1: how the app works
PTE is divided into 3 sections, called “Cook,” “Plan,” and “Shop.” The “Cook” section is where you enter, view, and organize recipes. The “Plan” section is a calendar view for creating your meal plan. And the “Shop” section is where all of your ingredients get pulled after you add recipes to your meal plan. Here are the details on how each of these areas work:
“Cook”
The “Cook” tab of PTE is where recipes are housed. It’s where you can do things like add new recipes, search for recipes you’ve already added, and keep track of meals in your freezer.
In the “Cook” area, you can enter recipes in a few different ways. You can:
- Pull them from the Internet using a web clipper
- Type them in by hand
- Have someone else share a recipe with you, and it will appear in your recipe list
“Plan”
When you click the “Plan” tab, it opens a calendar view for meal planning. Each day includes spaces for breakfast, lunch, dinner, and snacks. Adding a recipe to your meal plan is as simple as dragging and dropping it from the search bar on the left. You can also add a recipe to your planner from within the recipe itself by clicking on the “Plan” tab in the upper rightmost corner.
In “Plan” you can also scroll back as far as you like to see what you’ve planned in the past. You can also create menus to reuse again and again (more on this later!).
“Shop”
The “Shop” tab is where your grocery lists live. I say grocery lists (plural) because you can create a different list for each of the stores you frequent. This is helpful if you can only buy certain items at certain stores, or if you know something is cheaper at a particular store and want to remember to purchase it there.
You can add items to your grocery list in a few different ways. Firstly, you can type them in manually. Secondly, you can have the PTE program pull them from your meal plan automatically. This is done by changing the date range on the left sidebar. You can also pull in items from your “Staples List.” You do this by clicking on “Staples List” on the left sidebar, checking the box next to the items you need, and clicking “Copy to Shopping List” at the top of the screen. You can also add and delete items from your “Staples List” from this screen.
Plan to Eat review part 2: how it saves you time
Now that you’ve gotten a quick overview of how Plan to Eat works, now comes the fun part. In this section I’ll be sharing the many ways that Plan to Eat can save you time!
“Cook” timesaving features
Recipe entry is a breeze
Because of its web clipper feature, you can enter recipes into your PTE account in a matter of seconds. The recipe clipper imports a bunch of different information about the recipe, include ingredients, cooking instructions, and a picture if there is one available.
The web clipper also imports the url of the website you clipped the recipe from, which is one of my favorite features. That’s because I can easily figure out where I found a recipe online. If I like a recipe, I can revisit the website where I got it and search through their other recipes to find new ones to clip.
You won’t have to waste time hunting for a recipe
This is kind of a continuation of my last thought: ever make a fantastic recipe that your family loved and then completely forget where you found it? PTE prevents this from happening. Once you’ve entered or clipped a recipe, it’s in there until you choose to delete it. No more flipping through cookbooks, searching your bookmarks, or trying to remember which food blogger created that recipe you liked so much.
“Shop” timesaving features
You always have your shopping list with you
As long as you have your phone and Internet access, you will always have your shopping list with you. This saves time in two ways. Firstly, if you suddenly have some spare time and can make an unplanned grocery run, you don’t have to go home and get your paper grocery list first. Secondly, you can add items to your grocery list anytime, be it while in line at the Post Office or in the middle of making a recipe. Finally, because of the “Staples List” feature I mentioned above, you won’t forget to buy staple foods when you are actually at the store. So no more running out of milk and bananas (ok, this still happens sometimes at my house, but nobody’s perfect, right?).
You save time in the store by having an organized list
I’ve found that grocery shopping is a lot easier when my list is organized. PTE does this automatically for you by breaking down all of the items on your list into categories. Produce goes in the “Produce” category, oatmeal goes in the “Breakfast” category, etc., so you know what to look for on each aisle. This saves you time because you’re not forgetting things and having to criss-cross back and forth across the store.
A nice feature of PTE is that you can customize your grocery categories to suit your needs. In my PTE account, for instance, I created a category called “Asian Food Aisle.” Random things go into this category, such as pasta, salsa, and fish sauce, because that’s where those things are located in the grocery store I shop at. Once you change an item’s category, PTE remembers it and will automatically put it there next time.
Similar items are automatically grouped together in one place
PTE also groups like items together in the shopping list. So if you have recipe that requires “3 cloves of garlic” and another that requires “2 cloves of garlic,” then it will add those together and put “5 cloves of garlic” on your list. It does the math for you.
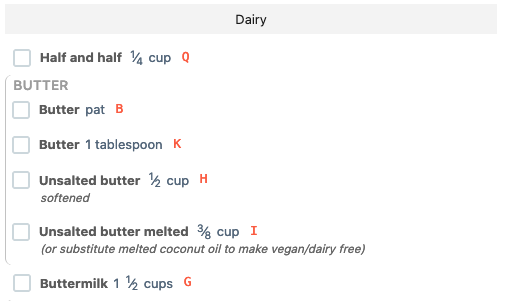
One caveat is that if your ingredients are written differently or the quantities can’t be added together (as in “Butter, pat” vs. “Butter, 1 tablespoon”), those items won’t be combined. But they will show up in the same place and be connected, as you can see in this screenshot below:

You can create multiple lists and share them with your spouse or partner
Additionally, you can create different lists for different stores. This means you don’t have to keep re-reading the names of items that you can’t buy in the store you’re currently at because they’re not sold there.
“Plan” timesaving features
You can meal plan from anywhere
Plan to Eat gives you the ability to meal plan from anywhere, as long as you have an internet connection. This allows you to meal plan during those random moments of downtime. I have even meal planned while my kids were playing on the playground. (I don’t recommend that being your go-to method of meal planning, but it works in a pinch.)
The best way that Plan to Eat saves time: cycle menu creation
Because Plan to Eat saves your recipes, meal plans, and menus in one centralized location, in practical terms, that means that it does the job of creating a cycle menu for you.
If you’re not familiar with the term “cycle menu” it just refers to a menu/meal plan that you use over and over again on a designated cycle. Schools, hospitals, nursing homes, and other places that cook for groups of people each day typically do so using a cycle menu. Because you’re in charge of your own meal plan, you can choose the cycle length. I’ve found that a cycle of 3 to 4 weeks long works well for my family, but you can make yours longer or shorter.1
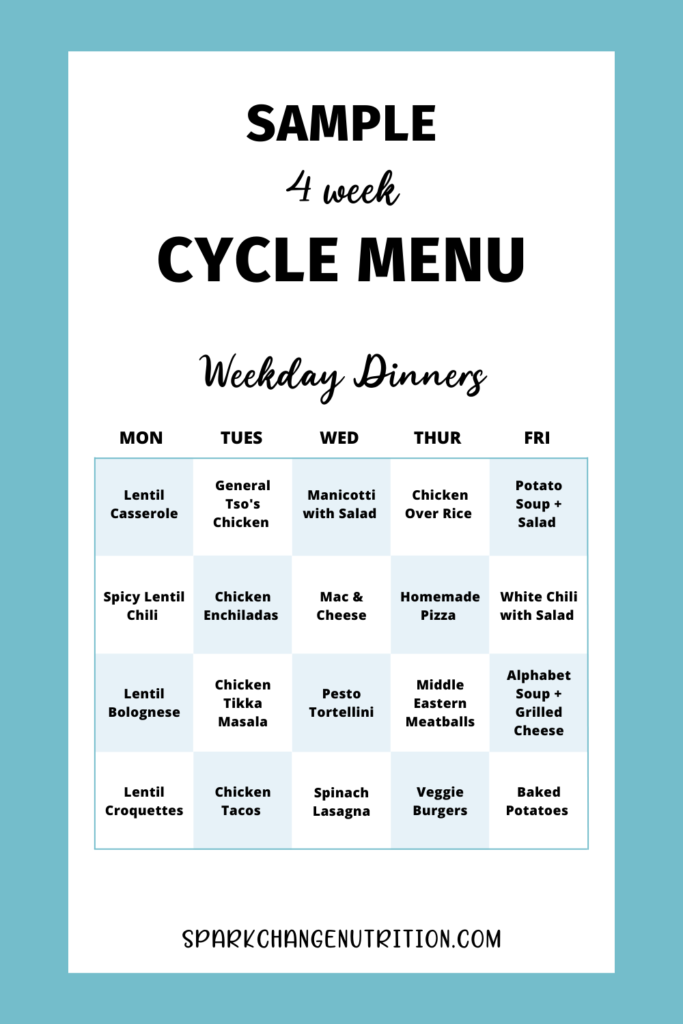
Here’s a really brief example of a cycle menu for weeknight dinners on a 4-week cycle:

Cycle menus are a huge time saver. Once you’ve made your meal plan, you will know in advance what you need to buy at the store, and you can potentially buy in bulk if you’re reusing a lot of the same ingredients. You also don’t have to reinvent the wheel each week by trying to create a brand new meal plan from scratch. I usually run through a cycle and then tweak the recipes depending on what worked and didn’t.
There are several different ways you can create a cycle menu using PTE. By far the fastest is to use one of your existing meal plans to create what PTE calls a “Menu.” This is how you do it:
- While in the “Plan” tab, click “Edit Plan” from the upper right corner of the screen.
- For “Select Action” choose “Save Menu.”
- Choose what you’d like saved (just the recipes, or recipes, ingredients, notes, etc.).
- Choose which meals you’d like saved (breakfast, lunch, dinner, snacks, notes, or all).
- Choose the date range you want to save.
- Enter a title and click “Confirm.”
That’s it!
It’s so easy, and it will make your future meal planning so much faster because you can just reuse what you’ve already done.
There are other ways to create menus as well. In researching for this Plan to Eat review post, I came across this video that walks you through the process:
Plan to Eat review: closing thoughts
I hope this Plan to Eat review has given you insight into how you can save time and simplify meal planning! The reason I recommend PTE so wholeheartedly is that your upfront input of time in setting it up and adding recipes to it will save you loads of time in the future.
PTE can be used exclusively on the web or you can download an app from the App Store. When you sign up for an account, you get a 30-day free trial. After the free trial ends, it costs $39 a year or $4.95 a month to continue your membership (pricing is in US dollars.) If you pay for a yearly membership, that breaks down to only $3.25 a month! Either plan you choose, your monthly cost is less than a latte. For something so fundamental to your health and wellness (helping you to eat right), that is a bargain!
If it is at all close to Black Friday, then I recommend waiting until then to purchase a subscription. That’s because they have had a 50% off Black Friday sale every single year since I started using it. If you’ve already purchased a subscription, you can still get the discount. Just buy another year while the deal is going, and it will push out your expiration date that much farther.
If you’ve enjoyed this Plan to Eat review and want to give it
a test run, click here to sign up for a 30-day free trial!
References
1. McWilliams M. Fundamentals of Meal Management. 5th ed. Pearson Prentice Hall; 2009:42-43.
Photo credit: Photo by Christin Hume on Unsplash


0 Comments